Introduction
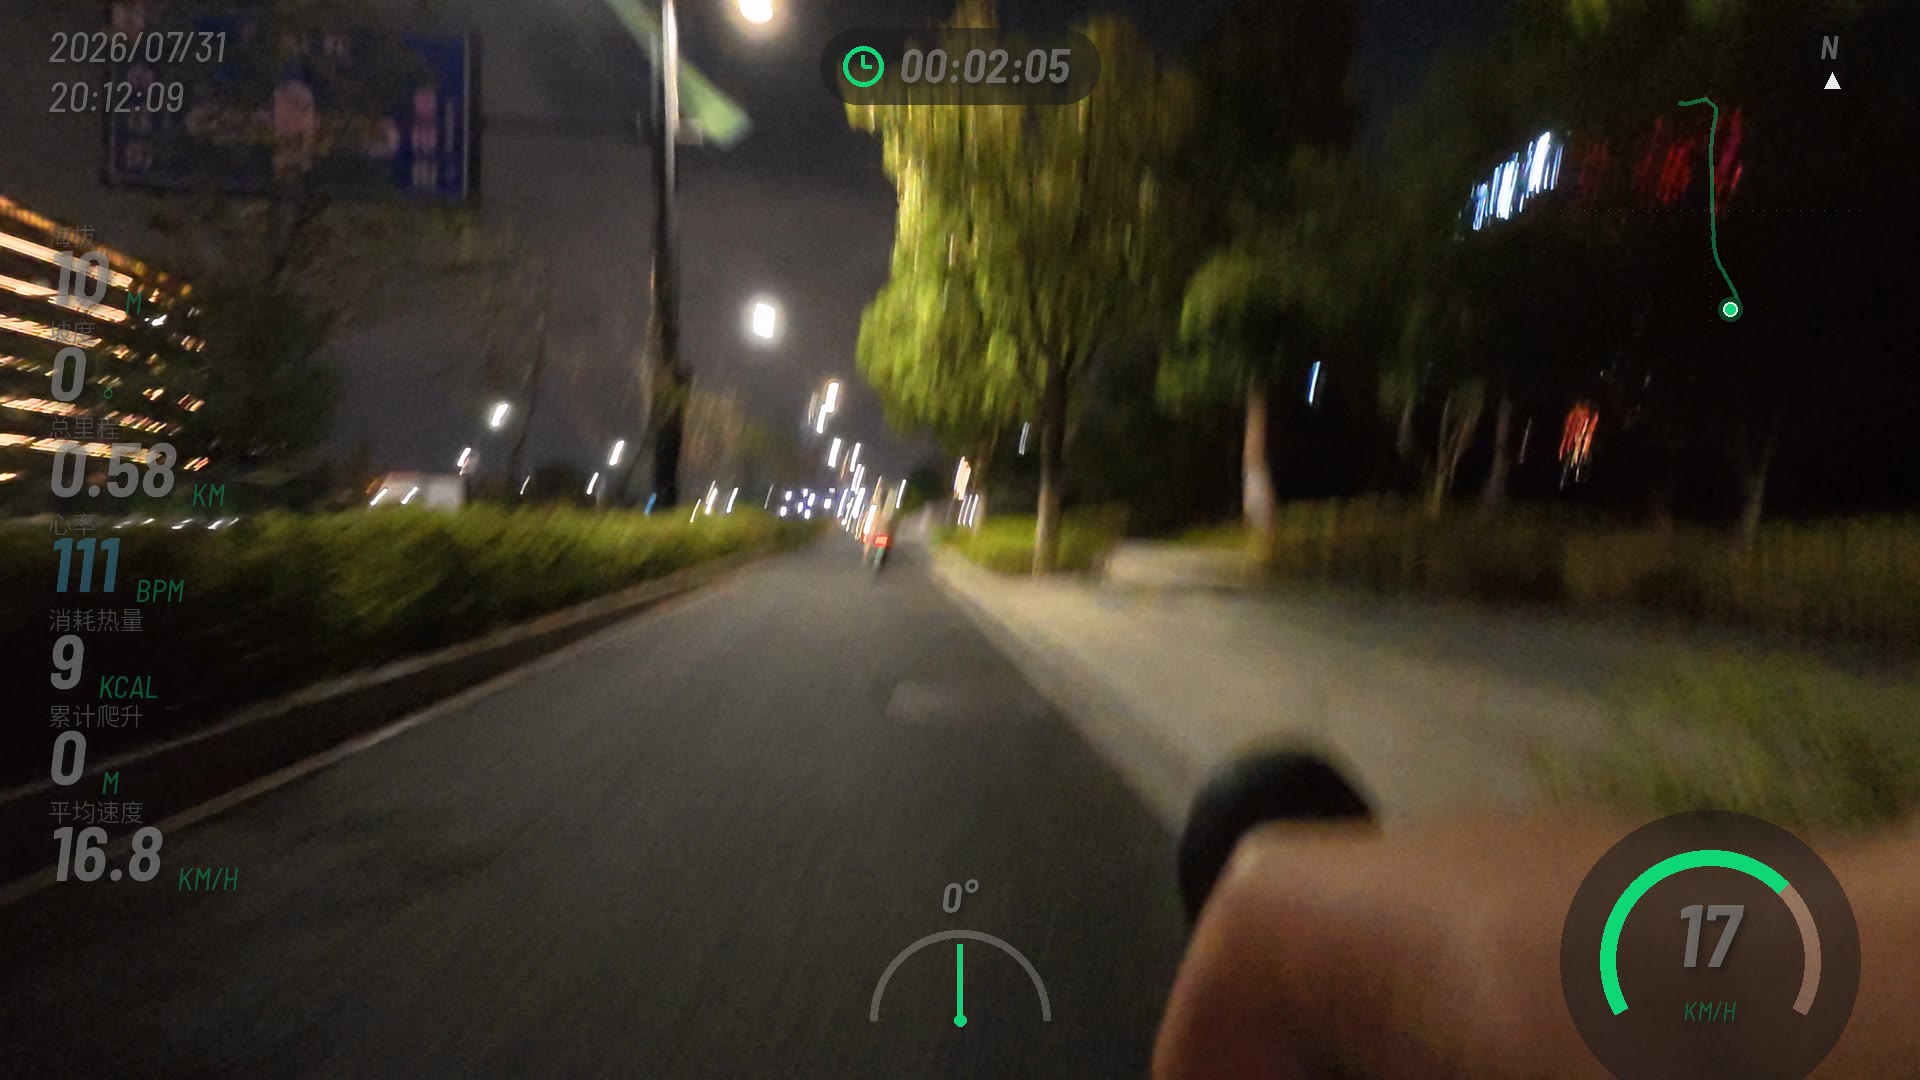
I’ve recorded quite a lot of video while cycling, and I’ve always wanted to add workout data to the picture — heart rate, speed, a track map, that kind of DJI / Garmin Virb-style dashboard overlay.
The first version I built was a web-based approach: HLS segments + hls.js playback, with an HTML + Canvas layer on top of the video rendering a real-time HUD. It worked, but it had several fatal flaws: on mobile, when you go fullscreen the HTML layer gets swallowed by the system player; once the video is downloaded or forwarded, the data is gone; and different browsers’ support for native HLS is uneven (new versions of Chrome claim to support HLS, but their behavior with AES-128 encrypted segments isn’t consistent).
So I decided to change the approach entirely: burn the data directly into the video frames. The data becomes part of the picture itself, so fullscreen, downloads, forwarding, and any player at all carry it along. This post documents the complete implementation.
Speaking of FFmpeg, the first time I encountered it systematically was more than a decade ago, reading the series of articles by CSDN blogger Lei Xiaohua. At the time I was working on livestream push/pull and used ffmpeg every day to push RTMP and ffplay to pull streams for testing. His illustrated posts explained concepts like filter, codec, and container with exceptional clarity, and later, when I did video segmentation, transcoding, and overlays, it all grew out of the foundation laid by that article. Sadly he’s no longer with us, but my introduction to video work really was taught by him.
Why Not Use DJI Studio
The conclusion first: the dashboard features in official apps like DJI Studio / Mimo only recognize DJI’s own data sources (the camera’s GPS, the phone). I tried GPX / FIT files exported from my Huawei watch — the files import fine, but the heart-rate field is masked, and the dashboard doesn’t show heart rate.
My actual situation is a bit more awkward: the heart rate lives in the Huawei watch, and the GPX / FIT files exported by Huawei Health have the heart rate masked — I tried both formats, the track was there and the heart rate was gone. But once the same data syncs to RQ Run, the heart rate is complete, and I had long since hooked RQ’s data into my self-hosted workout data service (the blog’s workout detail pages are rendered from it).
So the data source was actually already there: the server’s trkpt track points, with heart rate, speed, altitude, cadence, distance, and latitude/longitude all included. What was missing wasn’t data but a pipeline that “generates everything from a single sentence” — my final usage is: tell an AI agent over WeChat which directory the video is in, and it runs the script directly on the Linux server, parsing the data, burning it in, segmenting, encrypting, and uploading, all automatically. DJI Studio can’t give you that.
How Huawei Health Data Gets onto the Server
To pull heart rate and tracks out of a Huawei watch in complete form, there are two paths:
1. Export directly from the Huawei Health app (not recommended)
Open a record in the Huawei Health app, tap share or export, and you can get a .gpx or .fit file. The problem with this route: the heart-rate field is masked. I tried both formats — track, distance, and altitude were all there, but heart rate alone was gone, which is why DJI Studio can’t read heart rate either.
2. Sync through RQ Run + scrape with a Python script (recommended)
My actual pipeline is:
- In RQ Run (
https://www.rq.run), bind your Huawei Health account so RQ automatically syncs every workout. - Records on RQ have complete heart rate, and each record has detailed
trkpttrack points. - Use
rq_scraper.pyat the repository root to automatically log in to RQ, scrape the list and details, and upload them to the self-hosted workout data service.
The core logic of the script is:
|
How to run it:
|
The script uses Playwright to simulate login (with CAPTCHA recognition), then, once it has the cookies, calls RQ’s internal endpoint https://www.rq.run/Dc/Api?_=User/Record/get_record_info to fetch the complete track points for a single record, and uploads them to the server via POST /api/v1/workouts/detail. Uploads are deduplicated by original_id, and records with provider_id == 20 are labeled with the data source “Huawei Health.”
Once the server has stored the data, both the blog’s workout detail pages and the HUD-burning script can use it directly.
The Overall Approach
|
The data source is the workout server’s trkpt track points; each point contains: sec (second), heart_rate, speed, altitude, cadence, distance, and latitude/longitude. A 36-minute cycling record has roughly 430 points (one every 5 seconds).
Rendering HUD Frames Second by Second
The core idea: generate as many transparent PNGs as the video has seconds, with the i-th image corresponding to the data state of that second, then use FFmpeg to overlay them as a second input at 1fps.
Layout
Following the DJI dashboard layout:
- Upper left: date + real-time clock (workout start time + elapsed time ticking second by second)
- Top center: a dark rounded timing capsule
- Left column: data cards (large italic numbers + green italic units), adapted by workout type
- Upper right: a north-oriented track map (N marker + dashed reference lines + current position dot)
- Bottom center: a small grade arc gauge
- Lower right: a semicircular speedometer (cycling) / pace gauge (running)
The data cards adapt to the workout type — cycling shows altitude/grade/total distance/heart rate/calories burned/total climbing/average speed, while running switches to pace/cadence/average cadence and so on. With more than 6 items, line spacing automatically tightens.
Fonts Were the Biggest Pitfall
I first used WenQuanYi Zen Hei from the system, and the result was hard to describe. After trying a whole round of options, I settled on Barlow Semi Condensed Bold Italic for numbers and units (free for commercial use from Google Fonts, and the closest in character to the DJI dashboard), with Noto Sans CJK for the Chinese labels:
|
Two details:
- Don’t use PIL’s affine transform to fake italics — shearing makes the text look blurry. Just pick a font that has real italics.
- Replace the outline with a soft drop shadow: black text +
GaussianBlur(4)+ a 3px offset is far cleaner than the hard outline fromstroke_width.
Circular Clipping for the Track Map
In the first version the track drew outside the circular border — in CSS, border-radius: 50% + overflow: hidden clips naturally, but in PIL you have to build the mask by hand:
|
Data Alignment Pitfalls
- Cadence: Huawei devices give total cadence directly (
180), while RQ gives single-foot cadence (90, needs ×2). Use the median to decide: >130 is treated as total cadence and used directly, otherwise ×2. - Calories burned: The API only has the total, so I apportion it per second by distance share (closer to the real burn curve than a linear split by time).
- Heart-rate colors: Kept consistent with the web version (<110 white / <130 blue / <150 green / <170 orange / ≥170 red), with
--shown when there’s no data.
Burning and Transcoding with FFmpeg
After the HUD frames are generated, a single command handles burning + scaling + transcoding + HLS segmentation:
|
This command has two video inputs at once:
0:v: the original action-camera video (for example an MP4 exported from a DJI Action)1:v: the per-second HUD PNG sequence generated by Python
filter_complex completes the overlay in three steps:
|
scale2ref is the key. The main picture might be 4K (3840x2160) while the HUD frames are fixed at 1920x1080 — a direct overlay would leave the HUD covering only the upper-left quarter of the picture. scale2ref first uses the second input [vm] as a reference and scales the first input [1:v] to the same resolution, so no matter what size the original video is, the HUD fills the frame.
How do the per-second PNGs align with video time? Through -framerate 1 and -start_number:
-framerate 1means the image sequence is read at 1fps:hud_00000.pngcovers seconds 0-1,hud_00001.pngcovers seconds 1-2, and so on.-start_number 0means reading starts fromhud_00000.png.- For multi-part video (say an action camera recording in segments as
1.MP4,2.MP4), both parts share the same global HUD sequence. The first starts at 0, and the second must use-start_number 1273to begin reading from the PNG corresponding to global second 1273.
A few additional key points:
- Re-encoding is mandatory: overlay inherently requires re-encoding. As a bonus this solved an old problem — DJI originals are HEVC (H.265), and the MSE in Chrome/Edge can’t software-decode HEVC inside TS segments; converting to H.264 makes it playable everywhere.
-map 0:v:0 -map 0:a:0: Besides video and audio, DJI’s MP4s often carry private data streams and thumbnail streams. Muxing straight to TS without removing them causes errors, so-mapexplicitly takes only the first video stream and the first audio stream.- Bitrate control:
-preset veryfastbalances speed against file size;-crf 23is a common x264 quality setting. Action-camera originals are rich in detail, so if you want a smaller file you can push it to-crf 25.
In the full script tools/upload_workout_video.py, the FFmpeg command is assembled dynamically:
|
Here hud_start is the global starting second for the multi-part video, guaranteeing that timestamps and HUD frames correspond one-to-one.
The Rust HUD Renderer
Python + Pillow takes about 0.1-0.2 seconds to render one frame; a 36-minute video needs 2160 frames, which would take 3-4 minutes single-threaded. In actual testing, Python single-threaded rendering of 2168 frames takes around 8 seconds — already not slow, but you can still feel the bottleneck when it comes to 60fps or 4K video.
So I wrote a Rust renderer in tools/burn_video_hud_rust/, functionally identical to the Python version: the same layout, the same fonts, the same color scheme, the same data-parsing logic. The tech stack is:
image+tiny-skia: drawing and anti-aliasingab_glyph: font loading and glyph renderingrayon: multi-threaded parallel renderingureq: fetching the workout data API
Usage is the same as the Python version:
|
The build depends on the fonts under tools/fonts/:
NotoSansCJKsc-Regular.otfNotoSansCJKsc-Bold.otfBarlowSemiCondensed-BoldItalic.ttfBarlowSemiCondensed-MediumItalic.ttf
After rendering, the output also uses names like hud_00000.png, hud_00001.png, which FFmpeg picks up directly for the overlay — the artifacts are completely identical to the Python version’s.
The performance comparison is stark: for the same 2168 frames of 1920x1080 HUD, Python single-threaded takes about 8 seconds, while Rust + rayon takes about 0.2 seconds — roughly 40 times faster. tools/upload_workout_video.py automatically detects whether the Rust binary exists and prefers it when it does:
|
If your video is long and you need to iterate on the HUD style repeatedly, I suggest compiling the Rust version first; if you only run it occasionally, the Python version is enough.
HLS AES-128 Encryption and Key Delivery
I didn’t want the video to be lifted casually, so I used the HLS-standard AES-128 encryption: keyinfo.txt specifies the key URL, the local key file, and the IV; FFmpeg encrypts automatically while segmenting and writes #EXT-X-KEY into the m3u8.
The key design decision is that the key is not stored on OSS — it lives in the backend database and is delivered through a public endpoint that validates Referer/Origin:
|
- A browser requesting from the blog domain → allowed, returns the 16-byte key
- Empty Referer (hitting it directly with curl) → 403
- Another domain (hotlinked or embedded elsewhere) → 403 + blocked by CORS
The ceiling here should be stated plainly: this is a “keep out honest people, not determined ones” scheme — someone who can capture packets and forge a Referer can still get the key. For a public blog with no login, this is the reasonable upper limit — the goal is to stop people from simply right-clicking to save, or from carrying the m3u8 off to play on their own site.
Frontend Playback
After the burn-in, the frontend actually got simpler — the whole HTML HUD was deleted, and we returned to the native player:
- Read
workout_videos.jsonto get the OSS directory and probe forindex.json(404 = no video, don’t render the card) - Only load hls.js when the user scrolls to the video card
- hls.js fetches segments according to playback progress, and key requests automatically carry the Referer
- Multi-part videos generate one merged
all.m3u8; the progress bar shows total duration and can be dragged across parts
Pitfalls Encountered (All Worth Writing Down)
- CORS poisoning from CDN caching: A request with no Origin caches the
.tssegments into the CDN first; afterwards every cross-origin request receives that cached copy withoutAccess-Control-Allow-Origin, and hls.js gets completely blocked by the browser. The fix is to force-add the response header in the CDN domain configuration (so it applies even on cache hits). - Cloudflare blocking the Python UA: The script’s urllib key submission was blocked by error 1010; spoofing a browser UA solved it. For fingerprint-level TLS blocking, just switch to curl.
- Key consistency with resumable uploads: If encryption fails partway through segmenting, the key file must live and die with the segments — when the key is lost but stale segments remain, you must clear them and re-segment, otherwise you’re stuck with “old key in the segments, new key in the database,” a deadlock.
- Tuning for large segments: A 2-minute 1080p50 segment is 130-170MB; hls.js’s default 20-second timeout is certain death, so
fragLoadingTimeOuthas to be relaxed to 120s with more retries. - Occasional OSS 502s: Uploads must include exponential-backoff retries.
Results and Summary
The final result is the image at the top of this post: data burned into the picture at one frame per second — a 36-minute video, 2168 HUD frames, 19 encrypted segments. Fullscreen, download, forward — the data is always there.
The whole pipeline ultimately converges into one command:
|
latest automatically resolves to the most recent workout record. The way I generate videos now is: tell the AI agent over WeChat which directory the videos are in, and it executes this command on the server — parsing RQ data, rendering the HUD, burning and transcoding, encrypting and segmenting, uploading to OSS, submitting the key — the whole chain automatic, and a few minutes later it’s viewable on the blog’s workout detail page.
The entire implementation is really just two scripts: one in Python rendering frames, one FFmpeg pass transcoding and uploading. What took the most time was polishing the style — three rounds of font selection, and adjusting positions pixel by pixel against the reference image. The technology itself isn’t complex, but taking something from “viewable” to “good-looking” is where these little tools consume the most time.
If you also have an action camera plus workout data, this approach works as-is: just swap the data source for the parse results of your own GPX/FIT — the rendering and transcoding parts are entirely generic.
评论
0 条评论