本文主要讲解如何在网易云服务器上配置静态 IP
申请公网 IP
首先,确认你的服务器网络类型,是经典网络还是 VPC 网络,并申请公网 IP 地址绑定到对应的实例上。
Linux 配置
1.查看公网 IP 所在接口,可以看到公网 IP 配置在 eth1接口上,IP 地址59.111.94.179,并且子网掩码是255.255.248.0
[root@centos ~]
eth0: flags=4163<UP,BROADCAST,RUNNING,MULTICAST> mtu 1400
inet 10.173.32.146 netmask 255.255.248.0 broadcast 10.173.39.255
inet6 fe80::f816:3eff:fe49:d5cc prefixlen 64 scopeid 0x20<link>
ether fa:16:3e:49:d5:cc txqueuelen 1000 (Ethernet)
RX packets 28385 bytes 1648648 (1.5 MiB)
RX errors 0 dropped 0 overruns 0 frame 0
TX packets 122 bytes 34138 (33.3 KiB)
TX errors 0 dropped 0 overruns 0 carrier 0 collisions 0
eth1: flags=4163<UP,BROADCAST,RUNNING,MULTICAST> mtu 1500
inet 59.111.94.179 netmask 255.255.248.0 broadcast 59.111.95.255
inet6 fe80::f817:ff:fe11:39 prefixlen 64 scopeid 0x20<link>
ether fa:17:00:11:00:39 txqueuelen 1000 (Ethernet)
RX packets 1574 bytes 8604104 (8.2 MiB)
RX errors 0 dropped 0 overruns 0 frame 0
TX packets 7 bytes 502 (502.0 B)
TX errors 0 dropped 0 overruns 0 carrier 0 collisions 0
lo: flags=73<UP,LOOPBACK,RUNNING> mtu 65536
inet 127.0.0.1 netmask 255.0.0.0
inet6 ::1 prefixlen 128 scopeid 0x10<host>
loop txqueuelen 0 (Local Loopback)
RX packets 0 bytes 0 (0.0 B)
RX errors 0 dropped 0 overruns 0 frame 0
TX packets 0 bytes 0 (0.0 B)
TX errors 0 dropped 0 overruns 0 carrier 0 collisions 0
|
2.查看网关,使用 route -n 查看网关,可以看到公网的 gateway 是59.111.88.1
[root@centos ~]# route -n
Kernel IP routing table
Destination     Gateway         Genmask         Flags Metric Ref    Use Iface
0.0.0.0         10.173.32.1     0.0.0.0         UG    100    0        0 eth0
0.0.0.0         59.111.88.1     0.0.0.0         UG    101    0        0 eth1
10.173.16.0     10.173.32.1     255.255.248.0   UG    100    0        0 eth0
10.173.32.0     0.0.0.0         255.255.248.0   U     100    0        0 eth0
10.176.48.0     10.173.32.1     255.255.240.0   UG    100    0        0 eth0
10.206.28.0     10.173.32.1     255.255.252.0   UG    100    0        0 eth0
59.111.88.0     0.0.0.0         255.255.248.0   U     100    0        0 eth1
169.254.169.254 10.173.32.1     255.255.255.255 UGH   100    0        0 eth0
|
目前为止,我们已经知道了服务器的IP、子网掩码、网关了 现在开始配置静态 IP
3.编辑配置文件
其默认的配置 dhcp
[root@centos ~]
DEVICE="eth0"
BOOTPROTO="dhcp"
ONBOOT="yes"
|
修改为
[root@centos ~]
DEVICE="eth1"
BOOTPROTO="static"
ONBOOT="yes"
IPADDR=59.111.94.179
PREFIX=21
GATEWAY=59.111.88.1
DNS1=114.114.114.114
|
其中,255.255.248.0 用 CIDR 方式表示为21
4.关闭和启用接口
[root@centos ~]
Device 'eth1' successfully disconnected.
[root@centos ~]
成功激活的连接(D-Bus 激活路径:/org/freedesktop/NetworkManager/ActiveConnection/3)
[root@centos ~]
eth0: flags=4163<UP,BROADCAST,RUNNING,MULTICAST> mtu 1400
inet 10.173.32.146 netmask 255.255.248.0 broadcast 10.173.39.255
inet6 fe80::f816:3eff:fe49:d5cc prefixlen 64 scopeid 0x20<link>
ether fa:16:3e:49:d5:cc txqueuelen 1000 (Ethernet)
RX packets 28654 bytes 1670074 (1.5 MiB)
RX errors 0 dropped 0 overruns 0 frame 0
TX packets 247 bytes 64048 (62.5 KiB)
TX errors 0 dropped 0 overruns 0 carrier 0 collisions 0
eth1: flags=4163<UP,BROADCAST,RUNNING,MULTICAST> mtu 1500
inet 59.111.94.179 netmask 255.255.248.0 broadcast 59.111.95.255
inet6 fe80::f817:ff:fe11:39 prefixlen 64 scopeid 0x20<link>
ether fa:17:00:11:00:39 txqueuelen 1000 (Ethernet)
RX packets 4524 bytes 8787717 (8.3 MiB)
RX errors 0 dropped 0 overruns 0 frame 0
TX packets 17 bytes 1282 (1.2 KiB)
TX errors 0 dropped 0 overruns 0 carrier 0 collisions 0
lo: flags=73<UP,LOOPBACK,RUNNING> mtu 65536
inet 127.0.0.1 netmask 255.0.0.0
inet6 ::1 prefixlen 128 scopeid 0x10<host>
loop txqueuelen 0 (Local Loopback)
RX packets 0 bytes 0 (0.0 B)
RX errors 0 dropped 0 overruns 0 frame 0
TX packets 0 bytes 0 (0.0 B)
TX errors 0 dropped 0 overruns 0 carrier 0 collisions 0
|
windows 配置
1.首先还是需要绑定公网 IP 到对应的 Windows 实例
2.然后打开cmd,输入 ipconfig,如图所示,查看公网 ip 的网卡和公网 ip 地址和子网掩码
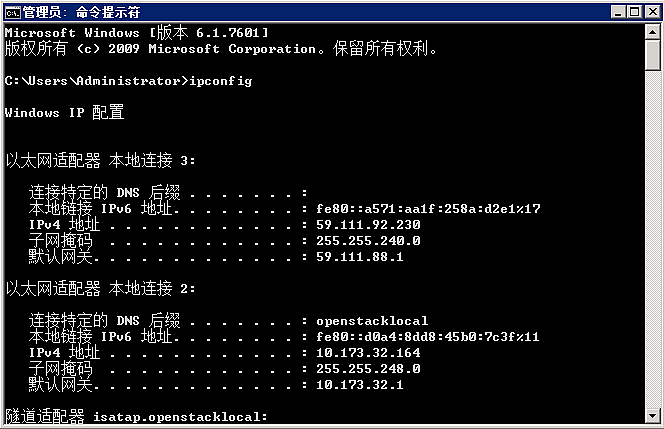
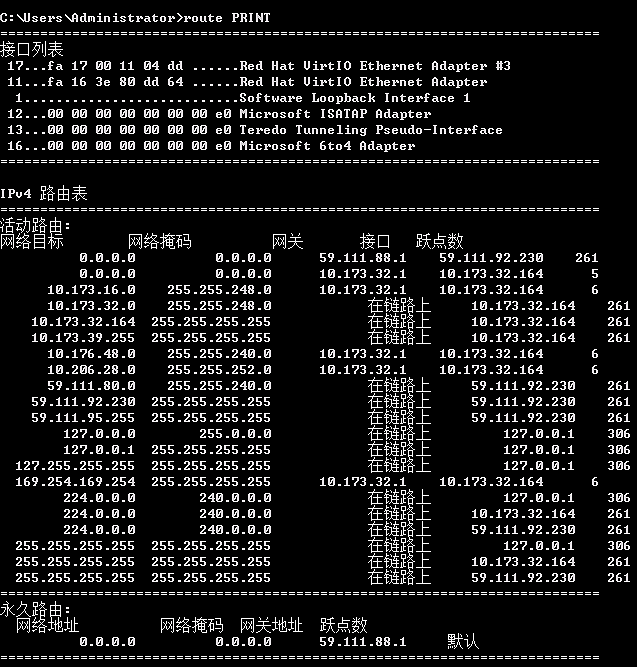
默认网关不显示 ip 的,使用 route PRINT,看第一行的接口是59.111.88.1
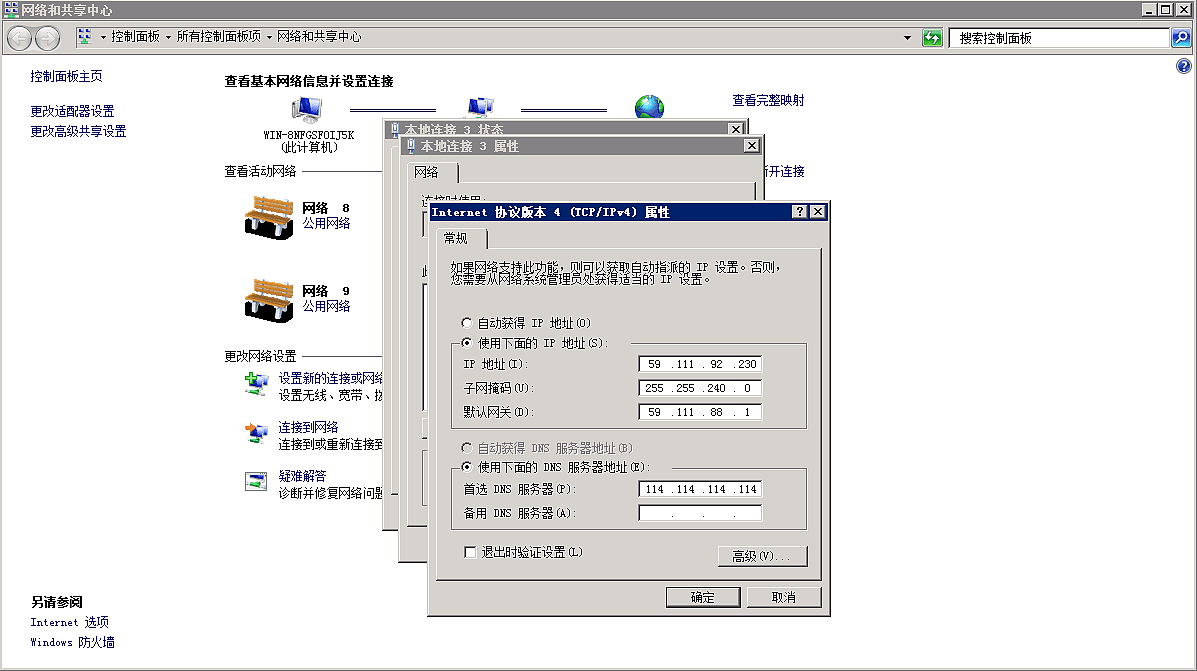
3.然后修改接口的 ip 为静态方式即可。
评论
0 条评论