什么是 Memcached
Memcached 是一个开源的、支持高性能高并发的分布式内存缓存系统,由 C 语言编写,共 2000多行代码。
传统 mysql 保存数据,web 服务器从中读取数据并显示,但是数据量大并且访问集中的情况下,数据库会有瓶颈,导致网站延迟大,用户体验差。
memcached 能够将数据库的查询结果缓存到内存中,减少数据库被访问的次数,提高性能,通常来说会被频繁读取的数据都可以存到 memcached 中,因为内存的读写速度比磁盘快,但是 memcached 也并不是没有缺点的,内存大家都知道叫随机存储器,一旦关机或掉电数据就会全部丢失。
memcached 使用 key-value 对的形式存储数据,它在内存中缓存的数据就像一张巨大 hash 表。memcached 的 value 只支持 string 类型。
如何使用 memcached 减轻服务器压力?
读取数据流程
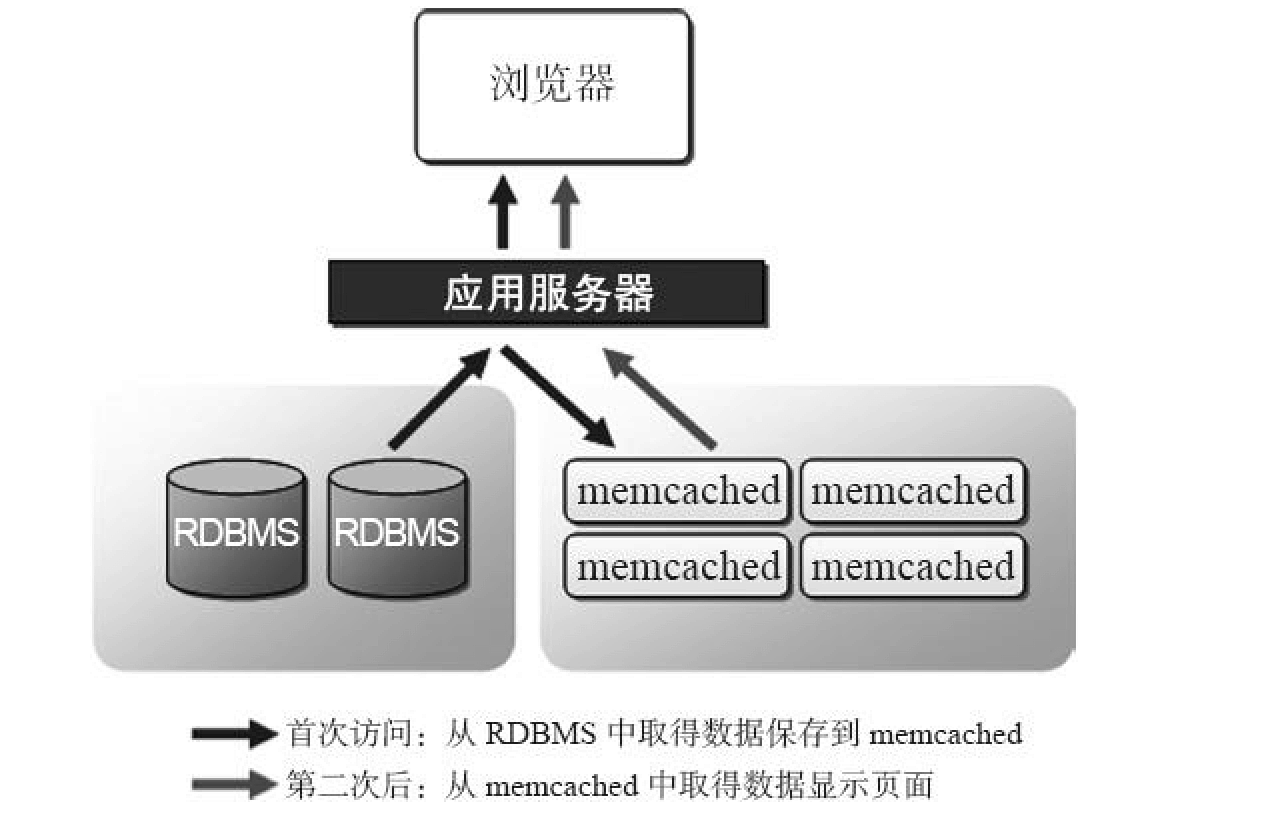
1.web 程序首先检查客户端请求的数据是否存在 memcached 中,如果存在直接返回,不会去请求数据库。
2.如果请求的数据不在 memcached 中,则会去请求数据库,然后读取数据返回客户端,同时在把新数据缓存一份到 memcached 中。
更新数据流程
1.当程序更新或删除数据库时,会首先处理后端数据库中的数据
2.在处理数据库中数据的同时,通知memcached,告诉它对应的旧数据失效,这样保证了2端数据的一致。
3. 如果是高并发读写场合,除了要通知 memcached 过期的缓存失效,还要有相关通知机制来预热数据
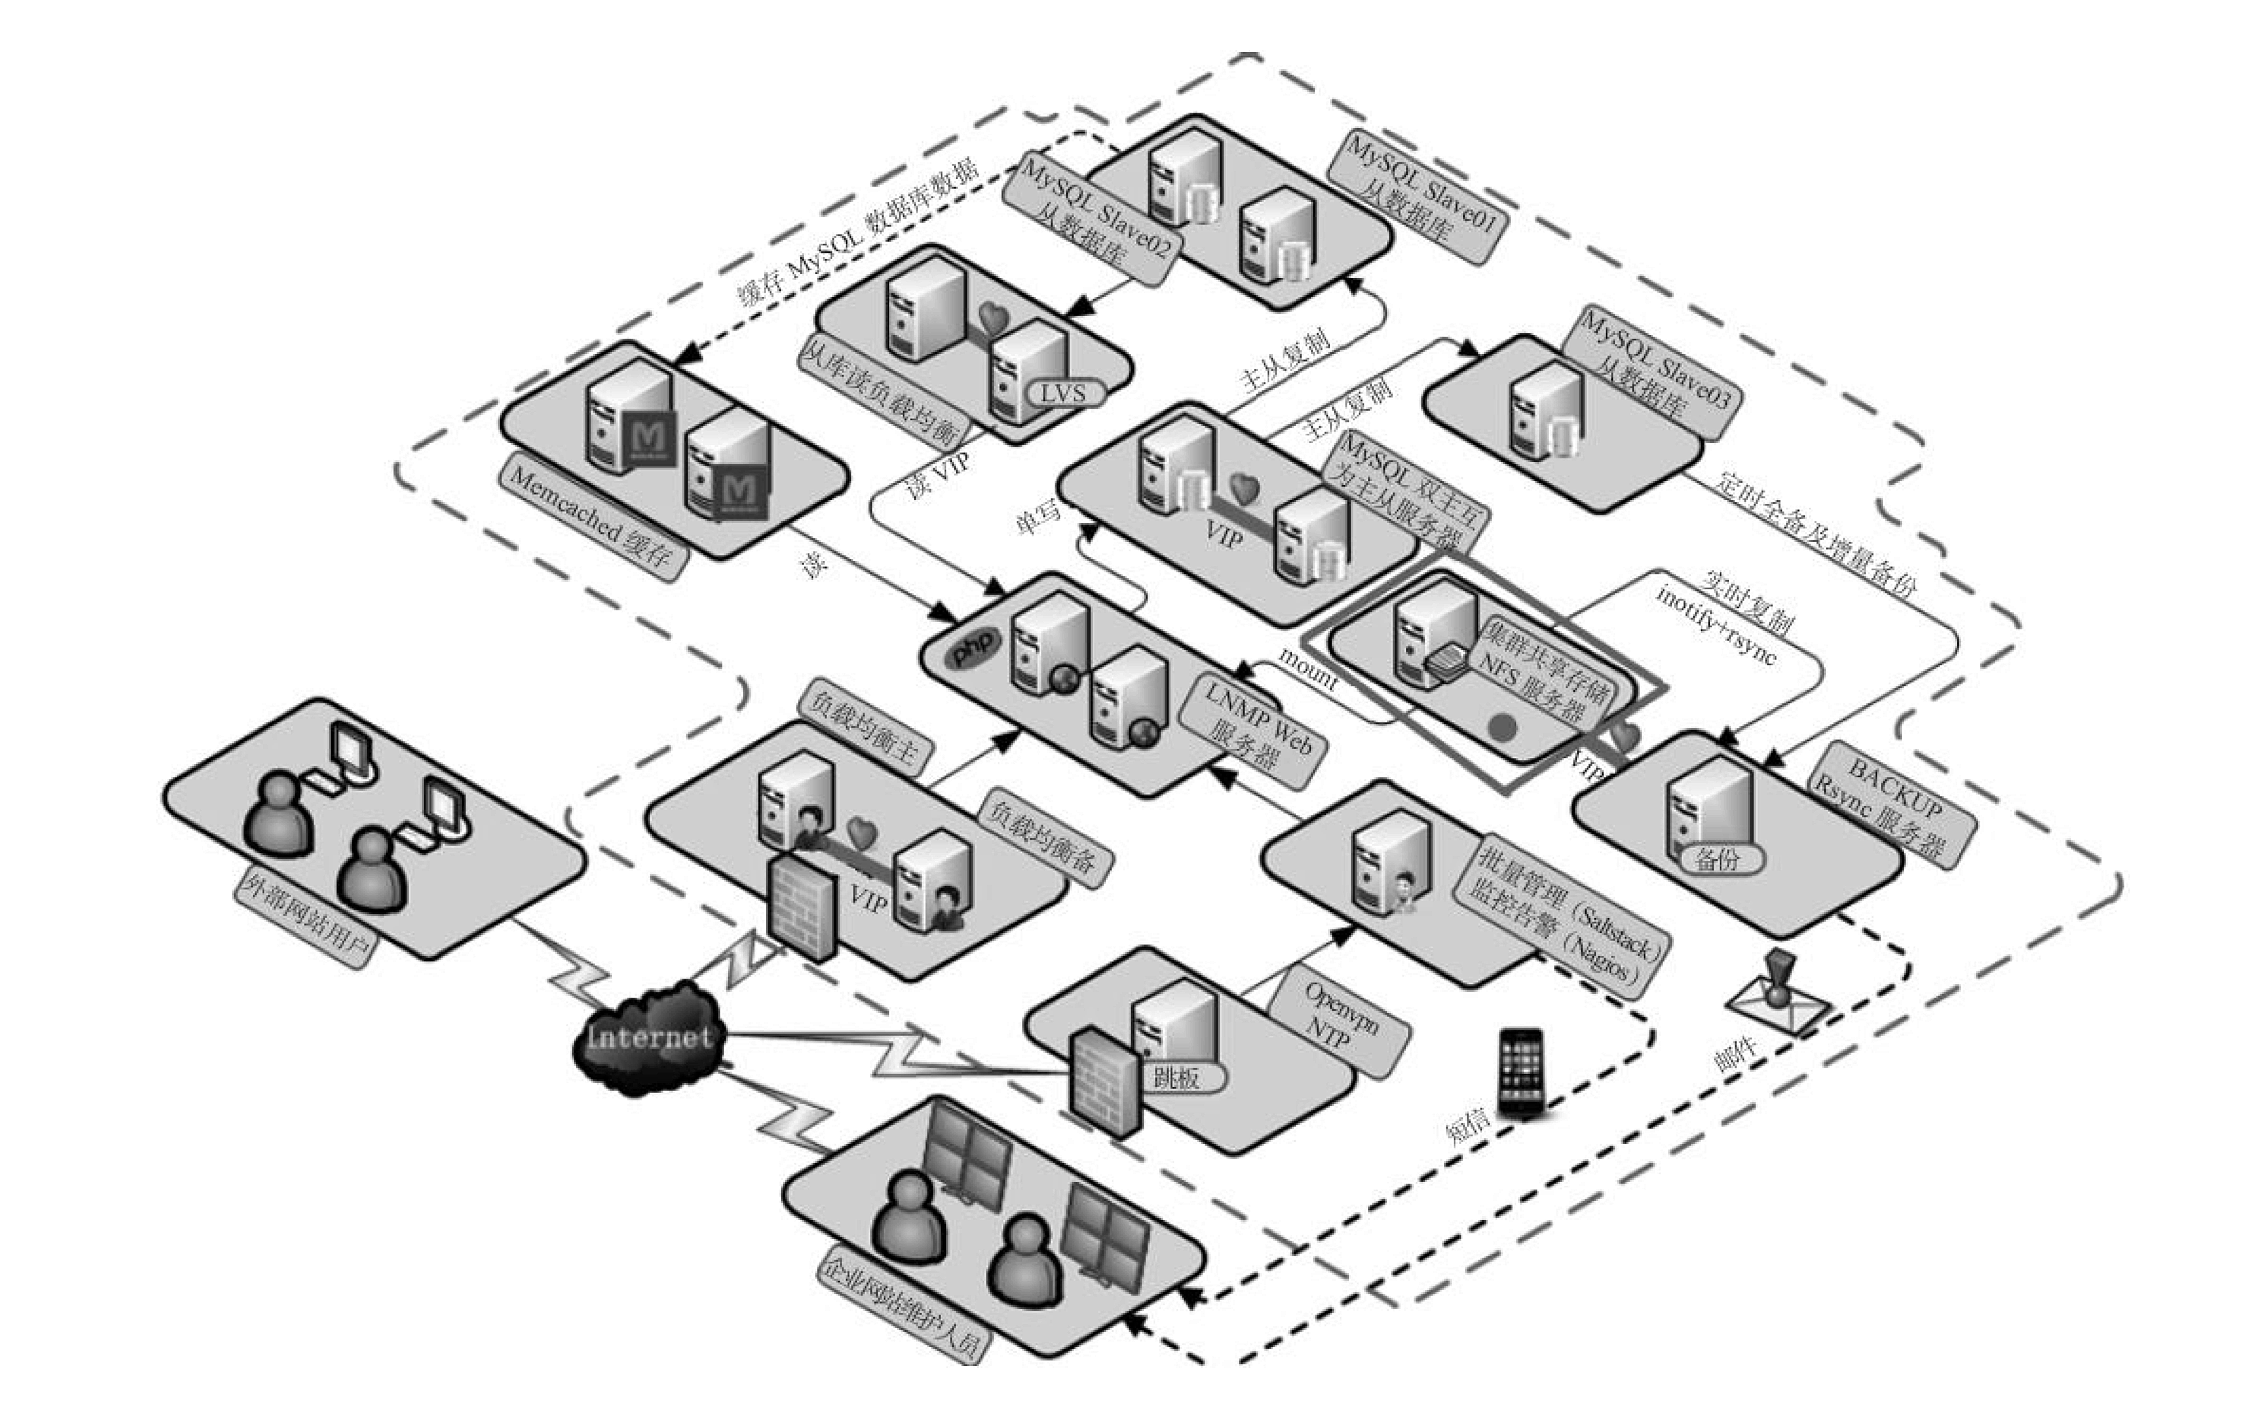
图为 memcached 在企业 web 服务中的位置
特点和工作原理
memcached 的协议简单,目前仅支持二进制和文本模式,你可以通过 Telnet 或 nc 等命令直接 操作 memcached。
二进制和文本模式的区别:
- 二进制:解码速度快,支持设置密码
- 文本模式:简单、稳定,不支持设置密码
支持 epoll/kqueue 异步 I/O 模型,使用 livevent 作为事件的处理通知机制
memcached 使用全内存缓存,效率高,其全部数据都存放于 memcached 事先分配好的内存中,无持久化存储设计。
当内存中的缓存数据容量达到服务启动时设定的内存值时候,就会自动使用 LRU 算法删除过期的缓存数据,也可以存放数据时对存储的数据设置过期时间,到期就被清除,其本身不健康数据过期,而是在访问的时候查看 key 的时间戳判断是否过期。
memcached 支持分布式集群,但是它没有 mysql 那样的主从复制,其分布式集群的不同服务器之间是互不通信的,节点独立,并且数据也不一样。比如 memcached 通过nginx的一致性 hash 算法进行负载均衡:
http {
    upstream test {
     consistent_ hash $ request_ uri;
    server 127. 0. 0. 1: 11211 id= 1001 weight= 3;
    server 127. 0. 0. 1: 11212 id= 1002 weight= 10;
    server 127. 0. 0. 1: 11213 id= 1003 weight= 20;

    }
web 端分布式的简单代码
"memcached_ servers" => array( '10. 4. 4. 4: 11211', '10. 4. 4. 5: 11211', '10. 4. 4. 6: 11211', )memcached 是一套类似 C/S 模式机构的软件,在服务器启动 memcached 服务守护进程,可以指定监听本地 IP 端口 并发访问数、以及预分配内存。
内存管理机制
采用了如下机制
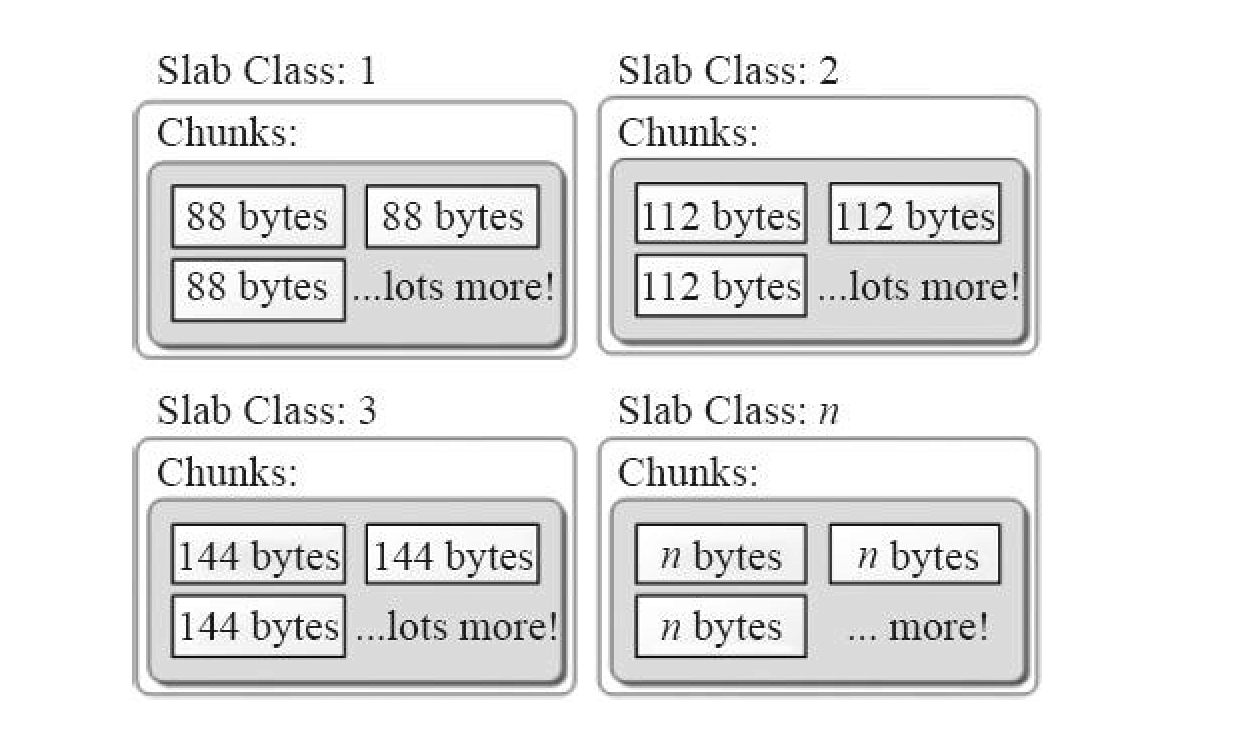
slab : 提前把大内存分配大小为 1MB 的若干 slab,然后针对每个 slab 进行小对象的填充,被称为 chunk,避免大佬重复的初始化和清理,减轻了内存管理的负担。这些 chunk 不会被释放而是会循环利用。当有新增数据对象时候,因为 memcached 保存着 slab 的内存空闲 chunk 的列表,可以直接将数据进行缓存。其解决了内存碎片化问题,但是无法高效利用内存
LRU 可以配置参数如下:
volatile-lru:根据LRU算法生成的过期时间来删除
allkeys-lru :根据LRU算法删除任何key
volatile-random:根据过期设置来随机删除key
allkeys-random:无差别随机删
volatile-ttl : 根据最近过期时间来删除(辅以TTL)
noeviction : 永不过期,返回错误
hash
多线程
采用 POSIX 线程模式
安装
yum install libevent libevent-deve gcc make cmake
wget -c http://file201503.oss-cn-shanghai.aliyuncs.com/memcached-1.5.6.tar.gz
tar zxvf memcached-1.5.6.tar.gz
./configure --prefix=/usr/local/memcached
如提示:
checking for libevent directory... configure: error: libevent is required.  You can get it from http://www.monkey.org/~provos/libevent/

      If it's already installed, specify its path using --with-libevent=/dir/
则
wget -c https://github.com/libevent/libevent/releases/download/release-2.1.8-stable/libevent-2.1.8-stable.tar.gz

tar zxvf  libevent-2.1.8-stable.tar.gz

cd libevent-2.1.8-stable
./configure
make
make install
然后切换到 memcached 目录
执行
./configure --prefix=/usr/local/memcached --with-libevent=/usr/local/lib/
make
make install
报错
[root@memcached memcached-1.5.6]# /usr/local/memcached/bin/memcached -h
/usr/local/memcached/bin/memcached: error while loading shared libraries: libevent-2.1.so.6: cannot open shared object file: No such file or directory
先使用
[root@memcached lib]# whereis libevent
libevent: /usr/local/lib/libevent.a /usr/local/lib/libevent.la /usr/local/lib/libevent.so
然后查看 memcached 依赖路径
LD_DEBUG=libs /usr/local/memcached/bin/memcached -v得到如下结果
    [root@memcached lib]# LD_DEBUG=libs /usr/local/memcached/bin/memcached -v
     54068:    find library=libevent-2.1.so.6 [0]; searching
     54068:     search cache=/etc/ld.so.cache
     54068:     search path=/lib64/tls/x86_64:/lib64/tls:/lib64/x86_64:/lib64:/usr/lib64/tls/x86_64:/usr/lib64/tls:/usr/lib64/x86_64:/usr/lib64        (system search path)
     54068:      trying file=/lib64/tls/x86_64/libevent-2.1.so.6
     54068:      trying file=/lib64/tls/libevent-2.1.so.6
     54068:      trying file=/lib64/x86_64/libevent-2.1.so.6
     54068:      trying file=/lib64/libevent-2.1.so.6
     54068:      trying file=/usr/lib64/tls/x86_64/libevent-2.1.so.6
     54068:      trying file=/usr/lib64/tls/libevent-2.1.so.6
     54068:      trying file=/usr/lib64/x86_64/libevent-2.1.so.6
     54068:      trying file=/usr/lib64/libevent-2.1.so.6
     54068:
/usr/local/memcached/bin/memcached: error while loading shared libraries: libevent-2.1.so.6: cannot open shared object file: No such file or directory
执行
sudo ln -s /usr/local/lib/libevent-2.1.so.6 /usr/lib64/再次执行即可
[root@memcached lib]# /usr/local/memcached/bin/memcached -h
memcached 1.5.6
-p, --port=<num>          TCP port to listen on (default: 11211)
-U, --udp-port=<num>      UDP port to listen on (default: 11211, 0 is off)
-s, --unix-socket=<file>  UNIX socket to listen on (disables network support)
-A, --enable-shutdown     enable ascii "shutdown" command
-a, --unix-mask=<mask>    access mask for UNIX socket, in octal (default: 0700)
-l, --listen=<addr>       interface to listen on (default: INADDR_ANY)
-d, --daemon              run as a daemon
-r, --enable-coredumps    maximize core file limit
-u, --user=<user>         assume identity of <username> (only when run as root)
-m, --memory-limit=<num>  item memory in megabytes (default: 64 MB)
-M, --disable-evictions   return error on memory exhausted instead of evicting
-c, --conn-limit=<num>    max simultaneous connections (default: 1024)
-k, --lock-memory         lock down all paged memory
-v, --verbose             verbose (print errors/warnings while in event loop)
-vv                       very verbose (also print client commands/responses)
-vvv                      extremely verbose (internal state transitions)
-h, --help                print this help and exit
-i, --license             print memcached and libevent license
-V, --version             print version and exit
-P, --pidfile=<file>      save PID in <file>, only used with -d option
-f, --slab-growth-factor=<num> chunk size growth factor (default: 1.25)
-n, --slab-min-size=<bytes> min space used for key+value+flags (default: 48)
-L, --enable-largepages  try to use large memory pages (if available)
-D <char>     Use <char> as the delimiter between key prefixes and IDs.
              This is used for per-prefix stats reporting. The default is
              ":" (colon). If this option is specified, stats collection
              is turned on automatically; if not, then it may be turned on
              by sending the "stats detail on" command to the server.
-t, --threads=<num>       number of threads to use (default: 4)
-R, --max-reqs-per-event  maximum number of requests per event, limits the
                          requests processed per connection to prevent
                          starvation (default: 20)
-C, --disable-cas         disable use of CAS
-b, --listen-backlog=<num> set the backlog queue limit (default: 1024)
-B, --protocol=<name>     protocol - one of ascii, binary, or auto (default)
-I, --max-item-size=<num> adjusts max item size
                          (default: 1mb, min: 1k, max: 128m)
-F, --disable-flush-all   disable flush_all command
-X, --disable-dumping     disable stats cachedump and lru_crawler metadump
-o, --extended            comma separated list of extended options
                          most options have a 'no_' prefix to disable
   - maxconns_fast:       immediately close new connections after limit
   - hashpower:           an integer multiplier for how large the hash
                          table should be. normally grows at runtime.
                          set based on "STAT hash_power_level"
   - tail_repair_time:    time in seconds for how long to wait before
                          forcefully killing LRU tail item.
                          disabled by default; very dangerous option.
   - hash_algorithm:      the hash table algorithm
                          default is murmur3 hash. options: jenkins, murmur3
   - lru_crawler:         enable LRU Crawler background thread
   - lru_crawler_sleep:   microseconds to sleep between items
                          default is 100.
   - lru_crawler_tocrawl: max items to crawl per slab per run
                          default is 0 (unlimited)
   - lru_maintainer:      enable new LRU system + background thread
   - hot_lru_pct:         pct of slab memory to reserve for hot lru.
                          (requires lru_maintainer)
   - warm_lru_pct:        pct of slab memory to reserve for warm lru.
                          (requires lru_maintainer)
   - hot_max_factor:      items idle > cold lru age * drop from hot lru.
   - warm_max_factor:     items idle > cold lru age * this drop from warm.
   - temporary_ttl:       TTL's below get separate LRU, can't be evicted.
                          (requires lru_maintainer)
   - idle_timeout:        timeout for idle connections
   - slab_chunk_max:      (EXPERIMENTAL) maximum slab size. use extreme care.
   - watcher_logbuf_size: size in kilobytes of per-watcher write buffer.
   - worker_logbuf_size:  size in kilobytes of per-worker-thread buffer
                          read by background thread, then written to watchers.
   - track_sizes:         enable dynamic reports for 'stats sizes' command.
   - no_inline_ascii_resp: save up to 24 bytes per item.
                           small perf hit in ASCII, no perf difference in
                           binary protocol. speeds up all sets.
   - no_hashexpand:       disables hash table expansion (dangerous)
   - modern:              enables options which will be default in future.
             currently: nothing
   - no_modern:           uses defaults of previous major version (1.4.x)
启动
[root@memcached lib]# /usr/local/memcached/bin/memcached -p 11211 -m 100m -vv -u root
slab class   1: chunk size        96 perslab   10922
slab class   2: chunk size       120 perslab    8738
slab class   3: chunk size       152 perslab    6898
slab class   4: chunk size       192 perslab    5461
slab class   5: chunk size       240 perslab    4369
slab class   6: chunk size       304 perslab    3449
slab class   7: chunk size       384 perslab    2730
slab class   8: chunk size       480 perslab    2184
slab class   9: chunk size       600 perslab    1747
其中 -p 指定端口 -m 指定预分配的内存大小 -vv 打印详细信息 -u 指定运行的用户
后台启动
/usr/local/memcached/bin/memcached -p 11211 -m 100m -d使用二进制模式启动
/usr/local/memcached/bin/memcached -p 11211 -m 100m -B binary
二进制协议支持接口
| 操作码 | 操作命令 | 备注 |
|---|---|---|
| 0x00 | Get | |
| 0x01 | Set | |
| 0x02 | Add | |
| 0x03 | Replace | |
| 0x04 | Delete | |
| 0x05 | Increment | |
| 0x06 | Decrement | |
| 0x07 | Quit | |
| 0x08 | Flush | 不支持 |
| 0x09 | GetQ | |
| 0x0a | No-op | |
| 0x0b | Version | 不支持 |
| 0x0c | GetK | |
| 0x0d | GetKQ | |
| 0x0e | Append | |
| 0x0f | Prepend | |
| 0x10 | Stat | 不支持 |
| 0x11 | SetQ | |
| 0x12 | AddQ | |
| 0x13 | ReplaceQ | |
| 0x14 | DeleteQ | |
| 0x15 | IncrementQ | |
| 0x16 | DecrementQ | |
| 0x17 | QuitQ | |
| 0x18 | FlushQ | 不支持 |
| 0x19 | AppendQ | |
| 0x1a | PrependQ | |
| 0x1b | Verbosity | 不支持 |
| 0x1c | Touch | |
| 0x1d | GAT | |
| 0x1e | GATQ | |
| 0x20 | SASL list mechs | |
| 0x21 | SASL Auth | |
| 0x22 | SASL Step |
文本协议支持接口
| 操作命令 | 备注 |
|---|---|
| add | |
| append | |
| bget | 同get |
| cas | |
| decr | |
| delete | |
| flushall | 不支持 |
| get | |
| gets | |
| incr | |
| prepend | |
| quit | |
| replace | |
| set | |
| stats | 不支持 |
| verbosity | 不支持 |
| version | 不支持 |
重要说明
memcached 强烈不建议开放公网访问,因为 memcached 同时监听 UDP 和 TCP 端口,而 UDP 协议相比较于 TCP 是比较简单的,不对数据做校验和确认,并且由于 memcached 是针对内存进行操作,读写速度非常快,如果权限设置不当被不法分子利用就很容易发起 DDOS 攻击。
Python 操作 memcached
1.安装库
pip3 install python-memcached2.连接操作
import memcache

mc = memcache.Client(['59.111.104.12:11211'],debug=True)
mc.set('name','python')

ret =mc.get('name')
print(ret)
3.集群
mc = memcache.Client([('1.1.1.1:12000', 1), ('1.1.1.2:12000', 2),('1.1.1.3:12000',3)])
